Software required to create Visual Studio workflows for SharePointBefore you can start to create custom Visual Studio 2005 workflows that can run on a
SharePoint server, you must install the following software:Windows Server 2003 (a server you can develop on)
SQL Server 2005 (as a prerequisite for WSS 3.0)
Windows SharePoint Services 3.0
Visual Studio 2005
Microsoft .NET Framework 3.0
Visual Studio 2005 Extensions for Windows Workflow Foundation
Windows SharePoint Services 3.0 SDK
If you want to create Visual Studio 2005 workflows for Office SharePoint Server 2007 (MOSS 2007), you’ll need MOSS 2007 and the Office SharePoint Server 2007 SDK.
Creating a custom Visual Studio 2005 workflow for SharePoint
Building workflows for SharePoint is a challenging programming exercise, which is best tackled in small steps.
Once you have learned how to deploy your first workflow, you can concentrate on learning how to use and implement the Workflow Foundation activities that are specific to SharePoint.
Creating Visual Studio 2005 workflows for SharePoint is a 2-step process:Design and write code for the workflow in Visual Studio 2005.
Deploy the workflow to a SharePoint server.In this tutorial, you will create a very simple and basic workflow, so that you have a workflow you can deploy to SharePoint and concentrate on getting through your first deployment of a custom Visual Studio 2005 workflow to SharePoint instead of dealing with the difficulties of implementing workflows for SharePoint.
To create a custom Visual Studio 2005 workflow:In Visual Studio 2005, create a new Project that is based on the Sequential Workflow Library template.
In the Solution Explorer, double-click the Workflow1.cs file to open the workflow designer.
Drag a LogToHistoryListActivty from the Toolbox and drop it under the onWorkflowActivated1 activity of the workflow.
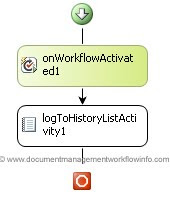
Figure 1. Basic Sequential Workflow in Visual Studio 2005 for deployment to SharePoint.
Select logToHistoryListActivity1, and set its HistoryDescription property in the Properties window to The workflow has run..
Build the workflow project.
Installing the workflow on SharePoint
You can now proceed to deploying the Visual Studio 2005 workflow to SharePoint.
To deploy the Visual Studio workflow to SharePoint, you must:
Make the compiled DLL of the workflow a strong named assembly by signing it with a strong name key.
Deploy the assembly to the Global Assembly Cache (GAC) and retrieve its publicKeyToken. You will use the publicKeyToken in the workflow.xml file.
Add the appropriate XML to the feature.xml and workflow.xml files.
Modify the install.bat file by following the instructions in it. You can perform a Find and Replace to change the name of the workflow’s Feature folder and change localhost to point to your SharePoint server.
Run the install.bat file to install the workflow on SharePoint.
Once you have installed the workflow, you must associate the custom Visual Studio 2005 to a SharePoint list or library.
Running the workflow on a SharePoint list or library
In the following example, I created a custom SharePoint list called MyFirstWorkflowList and associated it with the workflow. I named the workflow attached to the list MyFWF and set it to run whenever a new item is created.
In the figure below, you can see that a workflow instance has run on a newly created item.

Figure 2. A workflow instance has completed on a SharePoint list item.
If you click on the text Completed in the MyFWF column, you will open the Workflow Status page, where you will see the comment The workflow has run. in the Workflow History list.
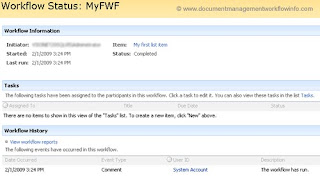
Figure 3. The Workflow Status page of the workflow instance that ran on the SharePoint list item.


